I could only come up with grommets.
11 Likes
I did look at eyelets, even found some at the craft store – but the eyelet tool is ridiculously expensive (made by Fiskars), and wouldn’t work anyway because the jaws of the tool are too small to reach the center of my disks.
…are an option but they are kind of big, and I don’t know whether they could be installed to allow free pivoting. Experiment time!
12 Likes
The grommet and eyelet essentially function as a washer. You could try a rubber (or plastic or metal) washer from the hardware store. That would be much cheaper, and be easier to replace in a pinch.
eta: in a real pinch, you could cut a slit in a square of cardboard and feed the brad arms through that. ![]()
12 Likes
Lovely machine.
I think pillar binding would suit. According to my search they are also known as Chicago Binding Screws
15 Likes
i have many year’s experience in print finishing (bindery). dial charts need eyeletting, if one does not want the cludgey DuoTang bend-over brads.
i do not think screwposts, having sourced many over the years, come in a short enough size for a two- or- three sheet dial chart.
@MrShiv , how are you drilling your center holes? of course that is critical to be sure your data points line up correctly as you turn the wheel.
my suggestion is not a DIY one. i would send you to a bindery that has paper drills and eyelet machines. if not, bend-over brads are your option, unless you can use a hand grommet setter with tiny grommets (eyelets) and just be sure to not crush them, or they won’t spin.
14 Likes
Could you use very thin washers with a brad? I’m thinking something on the order of 0.1mm washers on both sides of each disk, with a brad through the center; the washers on the inside might also make it easier to rotate the disks smoothly.
10 Likes
I just did a little experiment with my spouse’s grommet tools and it looks like that will probably be a useable low-tech solution.
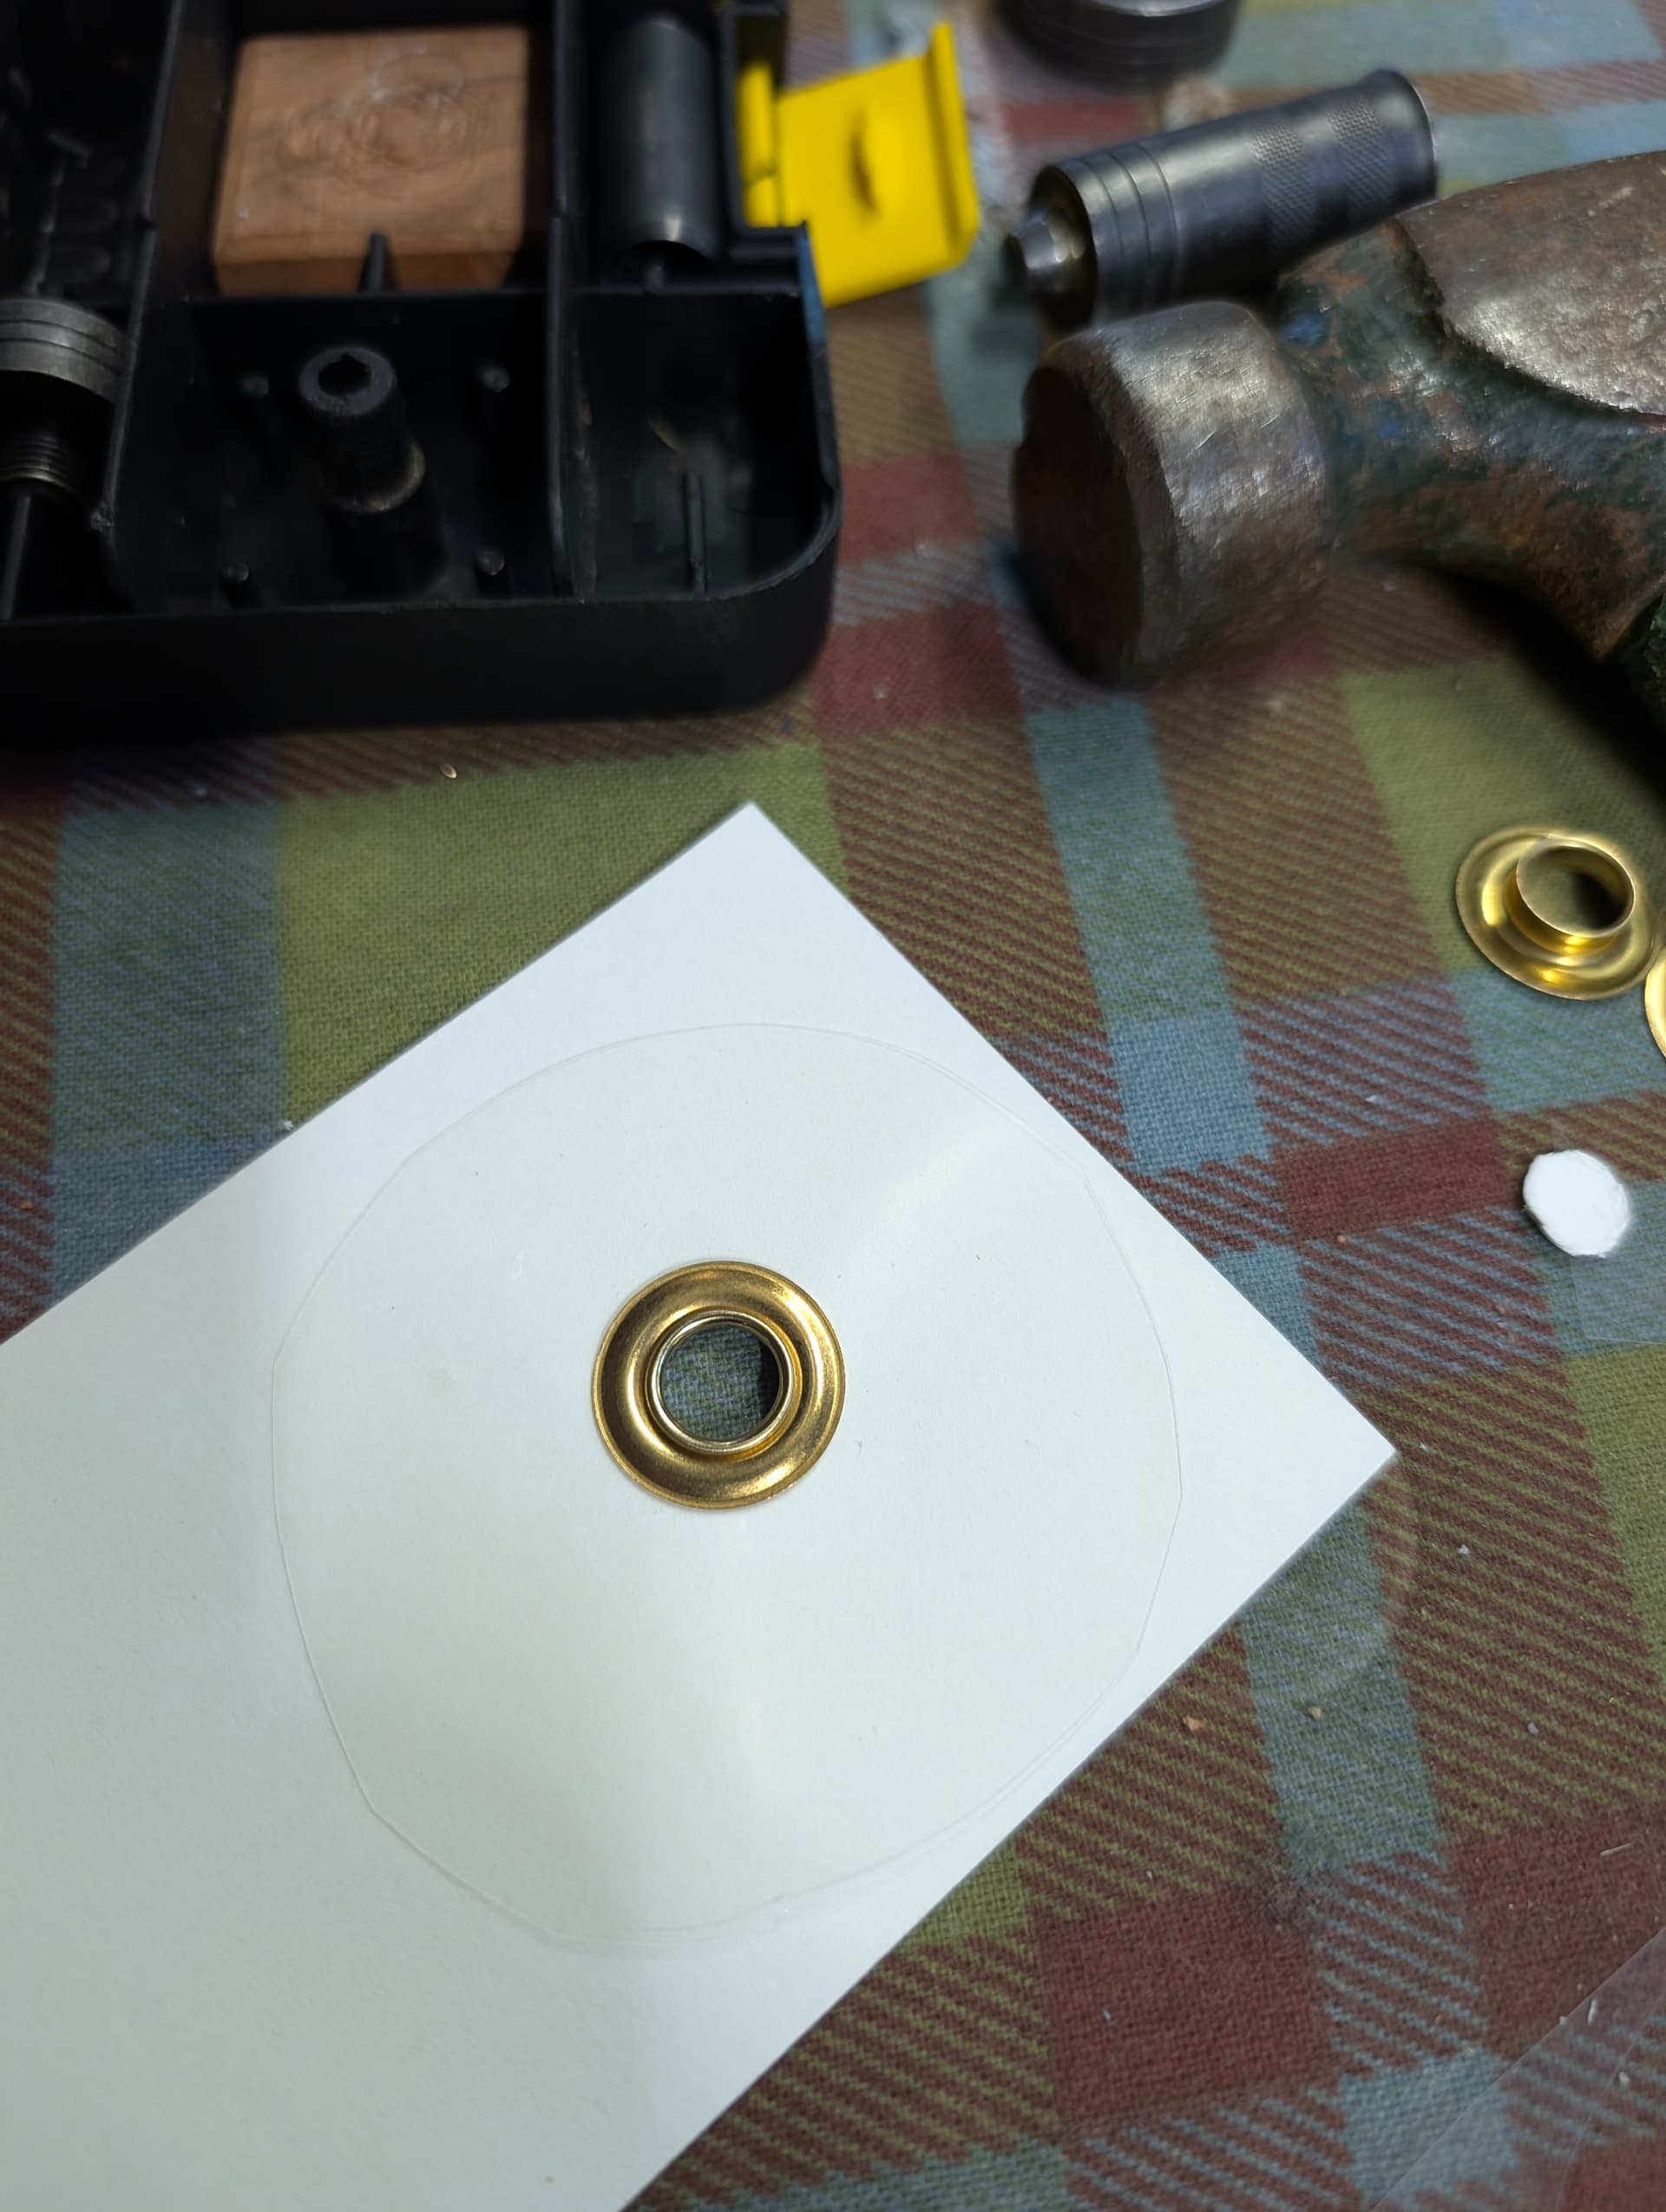
It was a little tricky to get the compression just right, too much on the first one I tried and my disc would not turn at all.
These are 3/8" grommets, the smallest size I have on hand. I wonder if they make 1/4".
I’m going to check around for a bindery in my area. Thanks for the suggestion.
16 Likes
i almost forgot a very important detail for your particular dial chart: waterproofing. consider laminating, or having them printed on synthetic paper, such as Yupo™, or Write-in-the-Rain™.
card stock printed, laminated, drilled and eyeletted is the winning ticket, but surely not the least spendy. your per-piece price, of course depends on how many you need to produce.
i have ideas, if you want to explore some DIY options, hit me up.
15 Likes
I have something like this at the cottage with mosquito netting over the bed. I’ve attached cup hooks to wall above the head of the bed, and the foot involves old curtain rods attached to the foot of the bed with massive amounts of duct tape, which wouldn’t be ideal for a couch.
There are also tent bed covers;
I will warn you that if you use mosquito netting to keep the cat off, it doesn’t work; they will just jump on it and get tangled in it.
18 Likes
Yeah, FedEx Kinkos can make these on acetate or styrene or some other kind of polymer, but they have to be sent out. I’m still working on the design, but the finished versions will definitely be waterproof.
I’m also hoping to “workshop” the idea with folks in the paddling community, as well as my safety boat colleagues. One thing I know is going to change is that the transparent red dial will be a different color, because many paddlers and their crews use red headlamps at night to preserve their night vision. I tested my design with a red headlamp and it was not very usable!
Probably for the first year I’m going to make maybe a couple dozen at most, by hand, and then get some feedback from the racers and crews before making more.
15 Likes
I’ve used split rivets like the one you show om leather, where you can sink them flush, but I don’t know how well they would work on something that needs to rotate. The same goes for the split-pin paper fasteners.
There are eyelet tools that are simply a pin with a shaped end that are driven with a hammer. Maybe a shoe repair place would be able to install one.
There are copper and aluminum solid rivets that are meant to be driven over a washer (the small washers intended for pop rivets are a good size). I may be telling you something you already know, but the trick is to use a ball peen hammer and go taptaptaptaptaptaptaptaptaptaptaptap…, not BANGBANGBANG, moving the hammer with each tap. Stop before the last tap that will lock up the gadget forever.
Tandy Leather sell two-part rivets that are set with a setting tool and a hammer. My preference is to slowly squeeze the parts together with a c-clamp, which gives a neater result.This kit should give you plenty of practice stopping short of an immovable bond. ![]()
13 Likes
excellent suggestion, that!
i also wondered about very short pop rivets that would have a wide enough flange, yet allow for a turnable dial (wheel).
above all, it is the positive centering of the hole and the “slop” of the fixing axial device.
13 Likes
One more thing to think about, I would like to use a fastener that has a hole through it, like a grommet or a pop rivet but not a screw post or split brad. These boats are small and there’s not a lot of room for gear, so everything gets lashed down or tied in in some way otherwise it can get lost. Anything I can loop a string through would be really helpful. Of course I can also drill a hole near one edge, probably will do that anyway
12 Likes
The problem with pop rivets is that they won’t break off the pin until they are fastened very tighltly.
Another very simple-minded approach just occurred to me, and that is to use a small machine screw and nut (washers on both sides). This has the advantage of being very adjustable. You could cut off the screw flush with the nut and peen the end to make sure it doesn;t fall apart.
That’s probably the best approach. A lanyard attached at the center might be annoying.
13 Likes
and interfere with the working of the piece.
11 Likes
Newer version with some mistakes fixed and other adjustments.
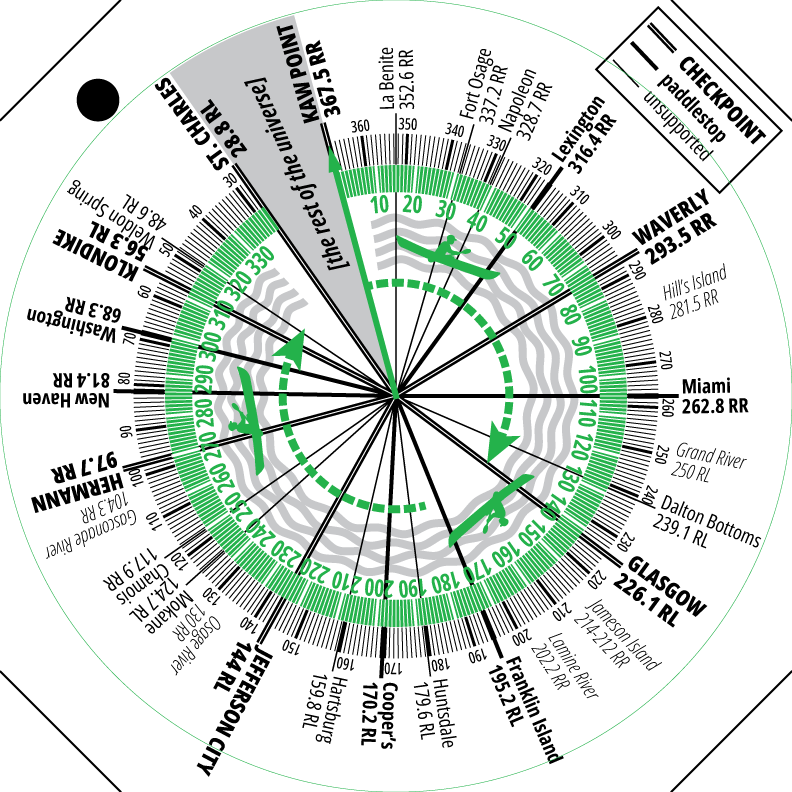
The rotating green part will be printed on transparency material. Green will show up better under red light. The black dot is for a lanyard hole. The square is 5.5" on a side, so I should be able to have these printed 2-up on letter size paper. The square design also leaves more room for the legend and for longer names (“JEFFERSON CITY” now fits). I might add more info or text into the other corners later. (“DRINK MORE ELECTROLYTES!”) Not sure yet if I want to cut off the corners as shown.
18 Likes
If readability under red light is a concern, you might want the overlay In yellow or a light purple. Green appears back under red light (I think)
10 Likes

If you have the thickness of styrene/acetate a 2mm binding screw might be sufficient (although I would look for a stainless steel one). You might need to shim with a spring washer/washer.
Alternatively a plastic popper (Amazon link) will rotate (but may also separate)
8 Likes
My vote for radiused corners so they don’t catch on stuff.
UV-stabilized plastic if obtainable and feasible. All coatings (like a UV-resistant coating) wear off with time.
UV-stabilized inks, if obtainable.
Yes to verifiably high-quality (low-oxidative) metal fastener, and not plastic fastener, due to durability issues and the UV problem.
11 Likes